Dark Chocolate Sea Salt Nut Bars-Easy Recipe
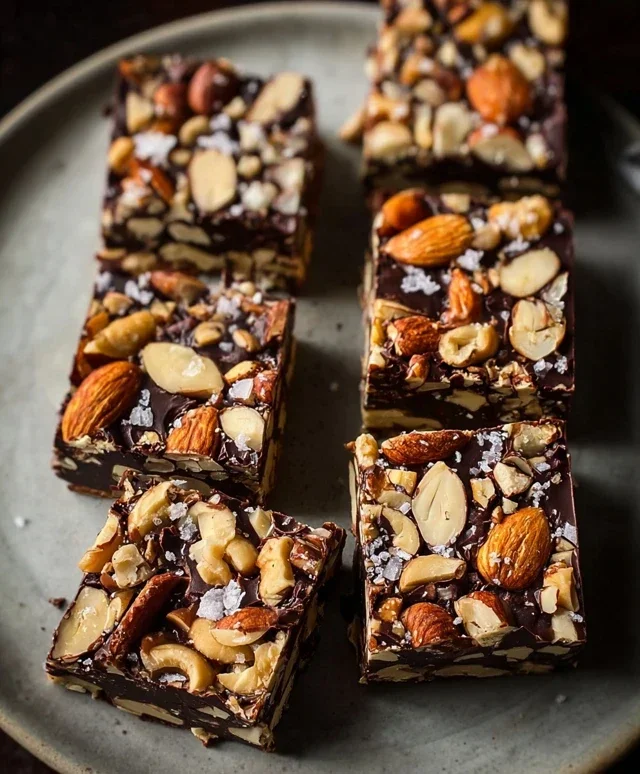
Dark Chocolate and Sea Salt Nut Bars are the ultimate treat for anyone seeking a satisfyingly sophisticated snack. Imagin extracte this: the rich, deep bitterness of premium dark chocolate mingling with the satisfying crunch of toasted nuts, all perfectly punctuated by the subtle sparkle of flaky sea salt. It’s a flavor combination that’s both classic and incredibly addictive, and honestly, I can’t get enough of it. This isn’t just any cookie bar; it’s an experience. The interplay of textures and tastes elevates these Dark Chocolate and Sea Salt Nut Bars from a simple sweet to a truly artisanal delight. Whether you’re looking for an energy boost for your afternoon slump, a post-workout reward, or a thoughtful homemade gift, these bars deliver. They’re surprisingly easy to whip up, proving that gourmet flavor doesn’t have to be complicated. Get ready to fall in love with your new go-to snack!
Why You’ll Adore These Bars:
The Perfect Sweet & Salty Balance
Irresistibly Crunchy Texture
Effortlessly Elegant Flavor Profile
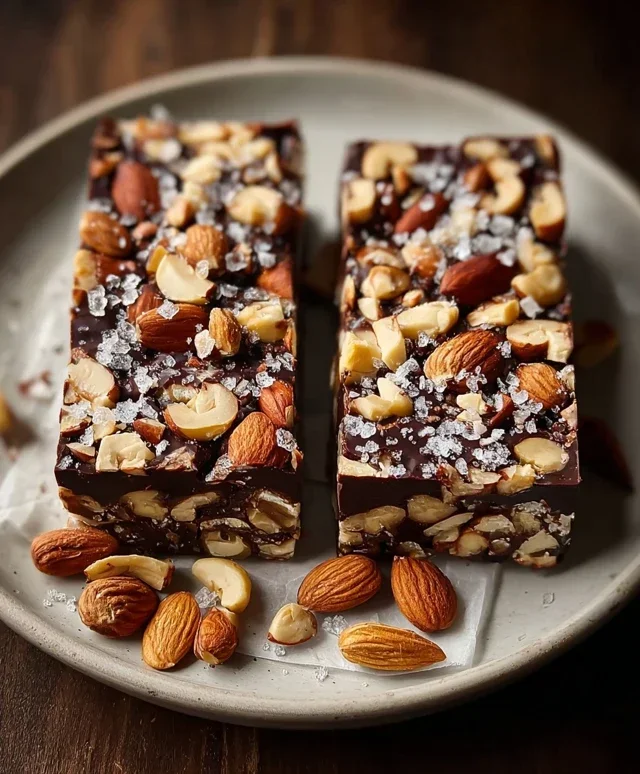
Dark Chocolate and Sea Salt Nut Bars
There are few things more satisfying than a homemade treat that perfectly balances sweet, salty, and nutty flavors. These Dark Chocolate and Sea Salt Nut Bars are exactly that. They’re incredibly easy to make, requiring no baking, and are packed with wholesome ingredients that will leave you feeling energized and satisfied. Whether you need a midday pick-me-up, a pre- or post-workout snack, or a healthier alternative to conventional candy bars, these bars are sure to become a favorite. The combination of crunchy nuts, airy puffed rice, a chewy binder, and decadent dark chocolate with a hint of sea salt is simply irresistible.
Ingredients:
Instructions:
Step 1: Prepare the Nut and Cereal Base
Begin extract by preparing your nuts. If you’re using whole nuts, give them a rough chop. You want some texture, so don’t go too fine. I like to have a mix of larger pieces and some smaller bits for a good mouthfeel. In a large mixing bowl, combine your chopped nuts with the puffed rice. The puffed rice adds a delightful lightness and crunch to the bars, creating a wonderful contrast with the denser nuts. Ensure your nuts are unsalted, as we’ll be adding salt later to control the flavor profile. If your nuts are already roasted, that’s perfectly fine, but raw nuts will also work, offering a slightly different flavor.
Step 2: Create the Binding Syrup
Next, we’ll prepare the binder that holds everything together. In a small saucepan, gently heat the brown rice syrup over low heat. You don’t want to boil it, just warm it enough so it becomes more fluid and easier to mix. Add the vanilla extract and the 1/2 teaspoon of sea salt to the warming syrup. Stir well to ensure the salt dissolves completely. The brown rice syrup provides a lovely chewy texture and a subtle sweetness. Adding the vanilla extract at this stage allows its flavor to meld beautifully with the syrup. The sea salt is crucial here; it will amplify the other flavors and balance the sweetness.
Step 3: Combine and Mix the Base
Pour the warm brown rice syrup mixture over the nuts and puffed rice in the large mixing bowl. Using a sturdy spatula or a wooden spoon, thoroughly combine all the ingredients. This is where the magic happens! You want to ensure every single piece of nut and puffed rice is coated in the sticky, sweet syrup. Press down gently as you mix to help everything bind together. It might seem a little dry at first, but keep stirring and pressing; the syrup will start to coat everything evenly. This step is key to creating bars that hold their shape without falling apart. Don’t be afraid to use a bit of elbow grease here!
Step 4: Form and Chill the Bars
Line a square or rectangular baking dish (about 8×8 inches is ideal) with parchment paper, leaving some overhang on the sides. This overhang will act as handles, making it super easy to lift the entire slab of bars out of the pan once they’re set. Transfer the nut and cereal mixture into the prepared baking dish. Now, using the back of your spatula, a flat-bottomed glass, or even your hands (lightly oiled if they stick), press the mixture down firmly and evenly into the pan. The firmer you press, the more compact and sturdy your bars will be. Get the surface as smooth and level as possible. Once pressed, place the dish in the refrigerator to chill for at least 30 minutes to an hour, or until firm. This chilling period allows the syrup to set and the flavors to meld.
Step 5: Prepare and Add the Chocolate Topping
While the base is chilling, prepare the dark chocolate topping. In a small, microwave-safe bowl, combine the dark chocolate chips and the coconut oil. Microwave in 30-second intervals, stirring well after each interval, until the chocolate is completely melted and smooth. Be careful not to overheat the chocolate, as it can seize. Alternatively, you can melt the chocolate and coconut oil in a double boiler. Once the nut base is firm, remove it from the refrigerator. Drizzle or spread the melted dark chocolate evenly over the top of the chilled nut mixture. If you’re feeling fancy, sprinkle a little flaky sea salt over the melted chocolate while it’s still wet. The flaky salt adds a delightful pop of salinity and texture that perfectly complements the rich chocolate and the nutty base.
Step 6: Final Chill and Cut
Return the baking dish to the refrigerator for another 30-60 minutes, or until the chocolate topping is completely set and firm. This is crucial for clean slicing. Once the chocolate is firm, use the parchment paper overhang to lift the entire slab out of the baking dish onto a cutting board. Using a sharp knife, cut the slab into your desired bar shapes. You can make them large and satisfying or smaller, bite-sized treats. Store the finished Dark Chocolate and Sea Salt Nut Bars in an airtight container in the refrigerator. They will keep well for up to a week, though I doubt they’ll last that long! Enjoy these incredibly delicious and guilt-free treats!
Conclusion:
And there you have it! These Dark Chocolate and Sea Salt Nut Bars are an absolute triumph of flavor and texture. The rich, slightly bitter dark chocolate perfectly complements the satisfying crunch of the nuts, while the flaky sea salt provides those irresistible little pops of savory brightness. They’re wonderfully satisfying, making them an ideal snack for busy afternoons, pre- or post-workout fuel, or even a healthier indulgence with your morning coffee. The beauty of this recipe lies in its simplicity and adaptability; you can truly make it your own!
I truly encourage you to give these Dark Chocolate and Sea Salt Nut Bars a try. They’re incredibly rewarding to make, and the results are simply divine. Enjoy them as they are, or get creative with the variations mentioned below. They’re perfect for sharing, but I wouldn’t blame you if you kept them all to yourself!
Frequently Asked Questions:
Can I use different kinds of nuts?
Absolutely! This recipe is very forgiving. Almonds, walnuts, pecans, hazelnuts, or even a mix of your favorites will work beautifully. Just ensure they are roughly chopped for an even texture.
What’s the best way to store these bars?
Store your Dark Chocolate and Sea Salt Nut Bars in an airtight container at room temperature for up to a week, or in the refrigerator for longer storage (up to two weeks). They’ll be firm and refreshing when chilled, making them extra delightful on a warm day.
Are there any ways to make these bars vegan?
Yes! To make these bars vegan, simply ensure your dark chocolate is dairy-free. Many high-quality dark chocolates are naturally vegan. All the other ingredients are typically plant-based.
Dark Chocolate and Sea Salt Nut Bars
Delicious and easy no-bake bars combining crunchy nuts, puffed rice, dark chocolate, and sea salt.
Ingredients
-
2 1/2 cups unsalted nuts of choice (3/4 cup cashews, 3/4 cup peanuts, 1 cup almonds)
-
1/2 cup puffed rice
-
1/4 cup brown rice syrup
-
1 1/2 teaspoon vanilla extract
-
1/2 teaspoon sea salt
-
1 cup dark chocolate chips
-
2 teaspoons coconut oil
-
flaky salt for topping (optional)
Instructions
-
Step 1
Line an 8×8 inch baking pan with parchment paper, leaving an overhang on the sides for easy removal. -
Step 2
In a large bowl, combine the nuts (cashews, peanuts, almonds) and puffed rice. Set aside. -
Step 3
In a small saucepan over low heat, gently warm the brown rice syrup, vanilla extract, and sea salt until just combined. Do not boil. -
Step 4
Pour the warm syrup mixture over the nut and puffed rice mixture. Stir well to coat everything evenly. -
Step 5
Press the mixture firmly into the prepared baking pan, ensuring it is evenly distributed. -
Step 6
In a small microwave-safe bowl, combine the dark chocolate chips and coconut oil. Microwave in 30-second intervals, stirring between each, until melted and smooth. -
Step 7
Pour the melted chocolate over the pressed nut mixture. Spread evenly. If using, sprinkle with flaky salt. -
Step 8
Refrigerate for at least 2 hours, or until the chocolate is firm. -
Step 9
Once firm, use the parchment paper overhang to lift the bars out of the pan. Cut into desired bar shapes.
Important Information
Nutrition Facts (Per Serving)
It is important to consider this information as approximate and not to use it as definitive health advice.
Allergy Information
Please check ingredients for potential allergens and consult a health professional if in doubt.