Easy Chicken Enchilada Roll Ups- Delicious & Quick
Chicken Enchilada Roll Ups are a weeknight dinner game-changer you’re going to adore! Imagin extracte all the craveable, comforting flavors of traditional enchiladas, but presented in a fun, bite-sized, and incredibly easy-to-serve package. Who doesn’t love a dish that delivers maximum flavor with minimum fuss? That’s the magic of these chicken enchilada roll ups. They’re perfect for family dinners, impromptu get-togethers, or even as a make-ahead meal prep option. What sets these apart is their delightful presentation – no more messy, stacked enchiladas! Each roll up is a neat, saucy parcel of deliciousness, making them a joy to assemble and even more of a pleasure to devour. Get ready to impress yourself and everyone at your table with this fantastic twist on a beloved classic.

Chicken Enchilada Roll Ups
Looking for a weeknight dinner that’s both incredibly flavorful and surprisingly easy to assemble? These Chicken Enchilada Roll Ups are about to become your new go-to. Forget the messy layering of traditional enchiladas; these offer all the deliciousness in a neat, bite-sized package. The combination of tender chicken, creamy cheese, and zesty taco seasoning, all wrapped up in a soft tortilla and baked to perfection, is simply irresistible. They’re also a fantastic way to use up leftover cooked chicken, making them even more budget-friendly and convenient.
Ingredients:
Cooking Instructions
Let’s get started on these flavor-packed roll-ups! The beauty of this recipe lies in its simplicity. We’re essentially creating a delicious filling and then rolling it up, so there’s no complicated sauce-making or delicate handling required.
First, we need to prepare our flavorful filling. In a large mixing bowl, combine the shredded chicken, softened cream cheese, and taco seasoning mix. It’s important that your cream cheese is softened to room temperature. This will make it much easier to incorporate into the chicken without any lumps, ensuring a smooth and creamy texture throughout your roll-ups. You can achieve softened cream cheese by letting it sit on the counter for about an hour, or by carefully microwaving it in short bursts (10-15 seconds at a time) until it’s pliable. Once you’ve added the taco seasoning, mix everything together thoroughly. I like to use a sturdy spoon or a spatula for this, ensuring that every strand of chicken is coated in the creamy, seasoned goodness.
Next, we’ll add the remaining components to create a truly robust filling. To the chicken and cream cheese mixture, add the drained diced tomatoes with green chilies, the minced garlic, half of the sliced green onions, and about half of the shredded Mexican or cheddar cheese. Drain the diced tomatoes and green chilies very well. Excess liquid can make your filling too watery and your tortillas soggy. You can drain them in a fine-mesh sieve or by pressing the liquid out with the back of a spoon. The minced garlic adds a pungent, savory depth, and the green onions bring a fresh, slightly sharp bite that complements the richness of the cheese and chicken. Mixing in half of the cheese now will help bind the filling together even more and ensure cheesy goodness in every bite. Stir everything until it’s well combined and you have a delicious, chunky filling.
Now it’s time to assemble these delightful roll-ups. Lay out one of the burrito-sized flour tortillas on a clean, flat surface. Spread about one-fifth of the chicken filling evenly over the surface of the tortilla, leaving a small border around the edges. Don’t overstuff the tortillas, as this can make them difficult to roll tightly and may cause them to burst during baking. A good rule of thumb is to have a layer of filling that’s about ½ inch thick. Once the filling is spread, tightly roll up the tortilla, starting from one edge and working your way to the other. Try to keep the roll as snug as possible. This will help prevent the filling from spilling out. You can tuck in the sides slightly as you roll if you find it helps create a neater package. Repeat this process with the remaining four tortillas and filling.
With your tortillas all rolled up, it’s time to get them ready for baking. Preheat your oven to 375 degrees Fahrenheit (190 degrees Celsius). Lightly grease a 9×13 inch baking dish. You can use cooking spray, butter, or a light coating of oil for this. This step is crucial to prevent the roll-ups from sticking to the bottom of the dish. Arrange the rolled enchiladas seam-side down in the prepared baking dish. This helps to keep them from unrolling during the cooking process. If they seem a bit crowded, that’s perfectly fine; a slightly snug fit can help them maintain their shape.
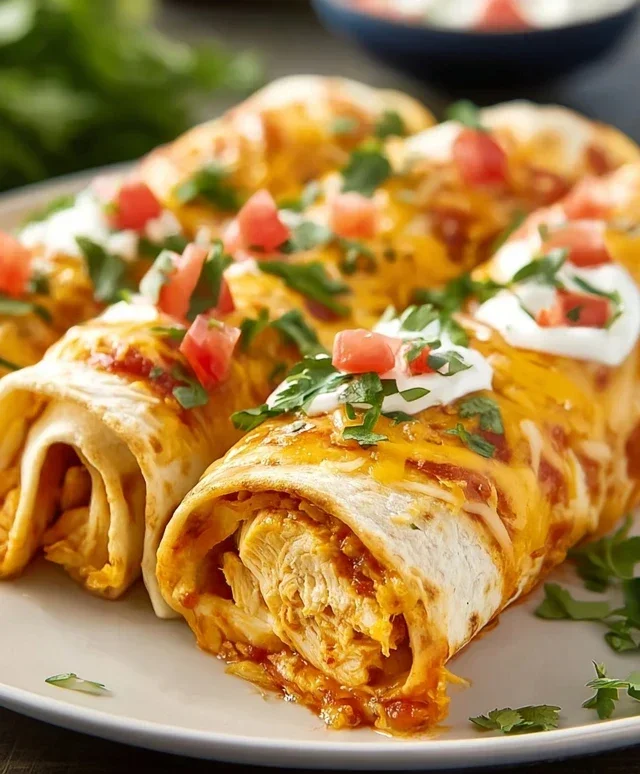
Finally, we’ll add the finishing touches and bake these beauties to perfection. Sprinkle the remaining shredded Mexican or cheddar cheese evenly over the tops of the rolled enchiladas. This creates a beautiful, golden-brown cheesy topping that’s irresistible. You can also scatter the remaining sliced green onions over the cheese at this stage if you like. Place the baking dish in the preheated oven and bake for 20-25 minutes, or until the tortillas are lightly golden and the cheese is melted and bubbly. Keep an eye on them to prevent over-browning. Once they’re out of the oven, let them cool for a few minutes before serving. This allows the filling to set slightly, making them easier to handle. Garnish with fresh chopped cilantro, if desired, for an extra burst of freshness and color. Serve warm and enjoy the rave reviews!
Conclusion:
There you have it – a simple yet incredibly satisfying recipe for Chicken Enchilada Roll Ups that I’m absolutely sure you’ll love! These roll ups are fantastic because they deliver all the comforting, savory flavors of traditional enchiladas in a much more manageable and fun format. They’re perfect for busy weeknights, casual gatherings, or even as a make-ahead meal. The combination of tender chicken, creamy cheese, and zesty enchilada sauce, all rolled up in a soft tortilla and baked to perfection, is simply irresistible.
I love serving these Chicken Enchilada Roll Ups with a dollop of sour cream, some fresh salsa, and maybe a side of cilantro-lime rice or black beans for a complete and delicious meal. For a bit of a twist, feel free to experiment with different cheeses – Monterey Jack, a spicy pepper jack, or even a blend of cheddar and mozzarella work beautifully. You could also add a layer of sautéed onions and bell peppers before rolling for extra texture and flavor. I truly encourage you to give these Chicken Enchilada Roll Ups a try; they’re a guaranteed crowd-pleaser and so easy to customize to your liking. Enjoy!
Frequently Asked Questions:
Can I make these ahead of time?
Absolutely! You can assemble the Chicken Enchilada Roll Ups and store them covered in the refrigerator for up to 24 hours before baking. You might need to add a few extra minutes to the baking time if they are chilled.
What if I don’t have enchilada sauce?
If you’re out of store-bought enchilada sauce, you can easily make your own! A simple version involves sautéing some onion and garlic, adding chili powder, cumin, and a touch of oregano, then simmering with tomato sauce and a little broth until thickened.
Can I use different meats?
Yes, you can! Shredded beef, beef, or even a vegetarian option using black beans and corn would be delicious in these roll ups. Just ensure your filling is well-seasoned.
Chicken Enchilada Roll Ups
Easy and delicious chicken enchilada roll ups, perfect for a weeknight meal or party appetizer. These are a simplified take on traditional enchiladas.
Ingredients
-
5 burrito sized flour tortillas
-
1 ounce packet of taco seasoning mix
-
3 cups shredded chicken
-
8 ounce package of cream cheese, softened
-
1½ cups shredded Mexican cheese or cheddar cheese
-
10 ounce can diced tomatoes with green chilies, drained
-
1 teaspoon minced garlic
-
4 green onions, sliced
-
½ cup chopped cilantro for garnish
Instructions
-
Step 1
Preheat oven to 375°F (190°C). -
Step 2
In a large bowl, combine shredded chicken, softened cream cheese, taco seasoning mix, drained diced tomatoes with green chilies, minced garlic, and half of the shredded cheese. Mix well. -
Step 3
Warm the tortillas slightly to make them pliable. You can do this by microwaving them for a few seconds or warming them briefly in a dry skillet. -
Step 4
Spread an even layer of the chicken mixture over each tortilla, leaving a small border at the edges. Sprinkle with sliced green onions. -
Step 5
Roll up each tortilla tightly, jelly-roll style. Place seam-side down in a greased 9×13 inch baking dish. -
Step 6
Top the roll-ups with the remaining shredded cheese and any extra sliced green onions. -
Step 7
Bake for 20-25 minutes, or until the cheese is melted and bubbly and the roll-ups are heated through. -
Step 8
Garnish with chopped cilantro before serving, if desired.
Important Information
Nutrition Facts (Per Serving)
It is important to consider this information as approximate and not to use it as definitive health advice.
Allergy Information
Please check ingredients for potential allergens and consult a health professional if in doubt.