Easy Dango Recipe – Quick & Delicious Japanese Mochi Balls
Easy Dango Recipe time! Who’s ready for a little taste of Japanese delight without a fuss? If you’ve ever dreamt of making those delightfully chewy, slightly sweet, and wonderfully versatile dango balls yourself, then you’re in the right place. Dango, with its signature pillowy texture and simple yet satisfying flavor, is a beloved treat for so many reasons. It’s the perfect snack, a delightful dessert, and an absolute star during seasonal festivals in Japan. What truly makes dango special is its incredible adaptability; you can enjoy it plain, drizzled with sweet soy sauce (mitarashi dango), coated in kinako (roasted soybean flour), or even skewered with fresh fruit. It’s that satisfying chew and subtle sweetness that just melts in your mouth. This easy dango recipe will have you whipping up these irresistible dumplings in no time, proving that delicious, authentic Japanese sweets are totally achievable in your own kitchen. Get ready to impress yourself and anyone lucky enough to share these with you!
Easy Dango Recipe
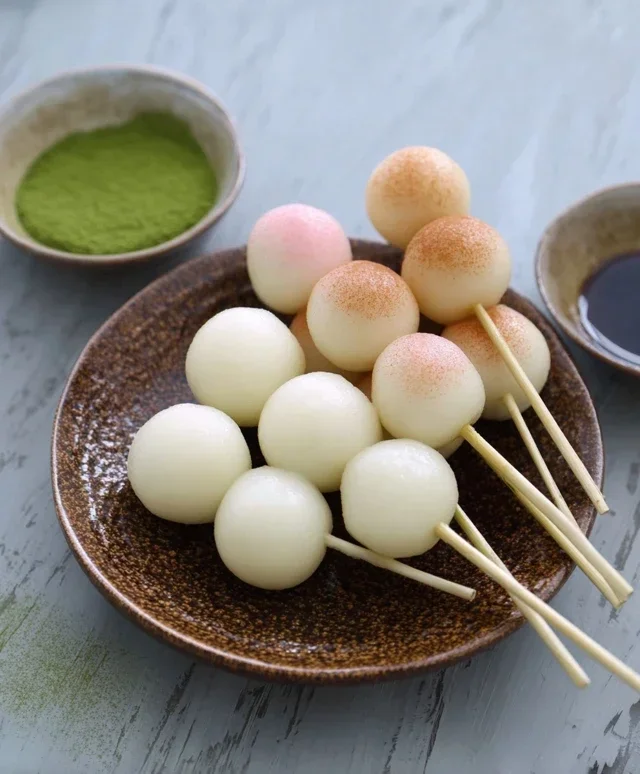
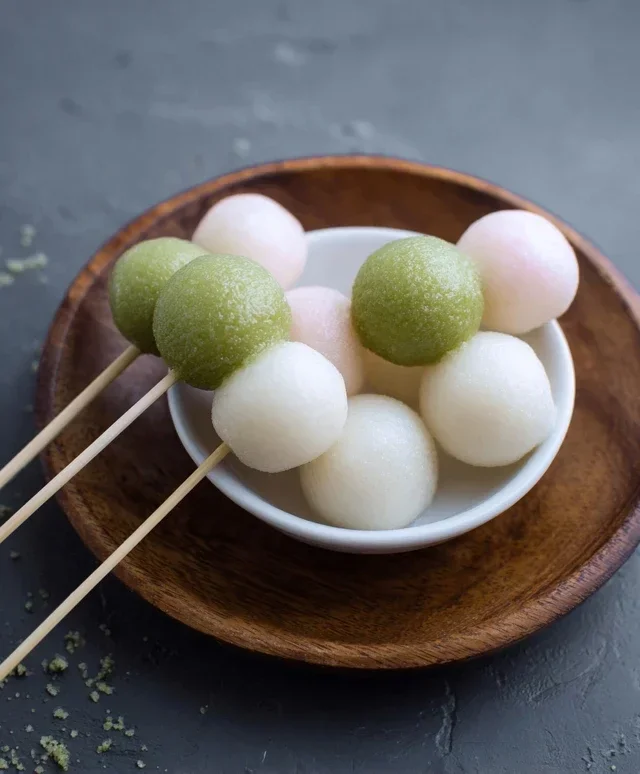
Dango are delightful, chewy Japanese rice dumplings that are surprisingly easy to make at home. Often served on skewers and drizzled with sweet sauces, dango are a popular treat for festivals, snacks, or even as a light dessert. This recipe focuses on simplicity, using readily available ingredients and straightforward techniques to help you achieve perfectly chewy and flavorful dango without any fuss. We’ll explore how to make classic plain dango, vibrant green matcha dango, and pretty pink dango, all from the same basic dough. The beauty of dango lies in its versatility and its satisfyingly springy texture. So, gather your ingredients, and let’s get started on creating these charming little dumplings!
Ingredients:
Making the Dango Dough
The foundation of delicious dango is a well-mixed dough. It’s crucial to use both Joshinko and Shiratamako flours as they contribute different textures. Joshinko, the non-glutinous rice flour, provides a firmer bite, while Shiratamako, the glutinous rice flour, is what gives dango its characteristic chewy and elastic texture. If you only used one type, your dango would either be too hard or too soft and gummy.
1. Combine Dry Ingredients: In a large mixing bowl, whisk together the Joshinko, Shiratamako, and powdered sugar (if you’re using it for added sweetness). The powdered sugar isn’t essential for the dango itself, but it gives them a pleasant mild sweetness if you plan to serve them without a very sweet sauce. Ensure everything is thoroughly combined to distribute the flours evenly.
2. Add Hot Water and Mix: Gradually pour in the hot water while mixing with a spoon or spatula. The water should be hot, but not boiling. This warmth helps to gelatinize the rice flour, which is key to achieving the right chewy texture. Be careful as you mix; the dough will start to come together. Continue mixing until no dry flour remains and you have a shaggy dough.
3. Knead the Dough: Once the dough is cool enough to handle, turn it out onto a clean, lightly floured surface. Knead the dough for about 5-7 minutes, or until it becomes smooth, pliable, and elastic. It should feel similar to play-doh. The kneading process develops the gluten-like structure in the rice flour, ensuring your dango will have that perfect bouncy chew. If the dough feels too dry, add a tiny bit more hot water (a teaspoon at a time). If it’s too sticky, add a tiny bit more Joshinko flour.
Dividing and Coloring the Dough
Now comes the fun part – adding color! This recipe allows for customization, so feel free to make all plain, or a vibrant mix.
1. Divide the Dough: Once your main dough is smooth and well-kneaded, divide it into three equal portions. You can eyeball this, or use a kitchen scnon-alcoholic ale for precision. One portion will remain plain, one will become green, and one will become pink.
2. Coloring the Dango:
Shaping and Cooking the Dango
With your colorful doughs ready, it’s time to shape and cook them. The key to perfectly cooked dango is gentle boiling.
1. Shape the Dango Balls: Take each portion of dough and roll it into small, bite-sized balls, about 1 to 1.5 inches in diameter. You can make them perfectly round, or slightly oval, it’s up to you. As you shape them, try to keep the sizes consistent so they cook evenly. You can place them on a plate or tray as you work. If you plan to skewer them later, you can slightly flatten the bottom of each ball to help them sit nicely.
2. Boil the Dango: Fill a large pot with plenty of water and bring it to a rolling boil over medium-high heat. Carefully drop the dango balls into the boiling water. Don’t overcrowd the pot; cook them in batches if necessary. You’ll notice that the dango will initially sink to the bottom.
3. Cook Until They Float: Continue to boil the dango. As they cook, they will begin extract to rise to the surface. Once they float, let them simmer for an additional 2-3 minutes. This ensures they are cooked through and have achieved that ideal chewy texture. If you are unsure, you can take one out and cut it in half; the inside should be uniformly opaque and soft, with no hard uncooked center.
4. Chill the Cooked Dango: Using a slotted spoon, carefully remove the cooked dango from the boiling water. Immediately transfer them to a bowl of ice-cold water. This shocking in cold water helps to firm up the dango and prevent them from sticking together. Let them chill in the ice bath for a few minutes.
5. Drain and Serve: Once chilled, drain the dango thoroughly. You can then thread them onto skewers (usually 3-5 dango per skewer) or serve them as they are. Dango are best served fresh, but they can be stored in an airtight container in the refrigerator for a day or two. You can gently reheat them in a steamer or microwave for a few seconds if desired. Enjoy your homemade dango with your favorite toppings, such as sweet soy glaze (mitarashi dango), red bean paste (anko), or a simple dusting of kinako (roasted soybean flour).
Conclusion:
There you have it – a wonderfully straightforward and incredibly satisfying Easy Dango Recipe! This recipe truly shines because it’s approachable for even complete begin extractners, uses simple, readily available ingredients, and results in delightful, chewy mochi balls that are a joy to eat. The slight sweetness from the sugar combined with the satisfying texture is simply perfect. We’ve explored how versatile these little treats are, from their classic toppings to some fun twists. I encourage you all to give this easy dango recipe a try; you might be surprised at how quickly you can whip up this authentic Japanese dessert in your own kitchen. Don’t be afraid to experiment with different sauces and coatings!
Serving Suggestions & Variations:
Dango are traditionally enjoyed with various toppings. The most classic is Anko (sweet red bean paste), but you can also drizzle them with sweet soy glaze (Mitarashi), dust them with kinako (roasted soybean flour), or even enjoy them plain. For variations, consider adding a touch of matcha powder to the dough for green tea flavored dango, or a few drops of food coloring for a vibrant, festive look. You could even serve them on skewers with fresh fruit for a delightful dessert platter.
Frequently Asked Questions:
What is the best flour to use for dango?
For this easy dango recipe, we recommend using glutinous rice flour, also known as sweet rice flour or mochiko. This flour is essential for achieving the characteristic chewy and soft texture of dango.
Can I make dango ahead of time?
Yes, you can make the dango balls ahead of time. Once cooked, let them cool completely and store them in an airtight container at room temperature for up to 2 days. Reheat them gently by steaming or microwaving briefly before serving, or enjoy them at room temperature.
What if my dango dough is too sticky or too dry?
If your dough is too sticky, gradually add a little more glutinous rice flour, a tablespoon at a time, until it’s manageable. If the dough is too dry and crum extractbly, add a small amount of water, a teaspoon at a time, until it comes together smoothly.
Easy Dango Recipe
A simple and delicious recipe for making homemade dango, a popular Japanese sweet rice dumpling, with options for coloring and sweetening.
Ingredients
-
1 1/3 cup Joshinko non-glutinous rice flour (150 g)
-
1 1/2 cup shiratamako glutinous sweet rice flour (200 g)
-
3/4 cup powdered sugar (optional, 75 g)
-
1 1/3 cup hot water
-
1 teaspoon matcha powder
-
1 teaspoon water (for matcha)
-
1 drop pink food coloring
Instructions
-
Step 1
In a large bowl, whisk together the Joshinko, shiratamako, and powdered sugar (if using). -
Step 2
Gradually add the hot water to the dry ingredients, mixing with a spatula or chopsticks until a shaggy dough forms. -
Step 3
Knead the dough with your hands until it becomes smooth and pliable, similar to playdough. If it’s too dry, add a little more hot water, a teaspoon at a time. If too sticky, add a tiny bit more Joshinko. -
Step 4
Divide the dough into portions. For colored dango, mix the matcha powder with 1 tsp water to form a paste and knead into one portion of dough. For pink dango, knead in the food coloring into another portion. Leave one portion plain. -
Step 5
Roll each portion of dough into small balls, about 1 inch in diameter. -
Step 6
Bring a pot of water to a boil. Carefully drop the dango balls into the boiling water. They will sink at first, then float to the surface when cooked. -
Step 7
Once the dango float, let them cook for another 2-3 minutes. Remove them with a slotted spoon and place them in a bowl of ice water to stop the cooking process and make them chewy. -
Step 8
Drain the dango and serve immediately, often with a sauce like sweet soy glaze (mitarashi dango) or coated in kinako (roasted soybean flour).
Important Information
Nutrition Facts (Per Serving)
It is important to consider this information as approximate and not to use it as definitive health advice.
Allergy Information
Please check ingredients for potential allergens and consult a health professional if in doubt.