Quick Pickled Red Onions- Easy & Vibrant Flavor
Pickled red onions are a true game-changer in my kitchen, and I’m so excited to share this recipe with you! There’s something truly magical about transforming humble red onions into these vibrant, jewel-toned strands. They bring an instant burst of tangy sweetness and a delightful crunch to just about anything they touch. Think about the last time you had tacos, avocado toast, or a hearty salad – a sprinkle of pickled red onions takes that dish from good to absolutely unforgettable. People love them because they’re incredibly versatile, adding a zesty counterpoint to richer flavors and a pop of color that’s as beautiful as it is delicious. What makes these pickled red onions so special is their simplicity; with just a few pantry staples, you can create a condiment that elevates everyday meals into something truly special.
Pickled Red Onions: The Vibrant Condiment That Elevates Everything
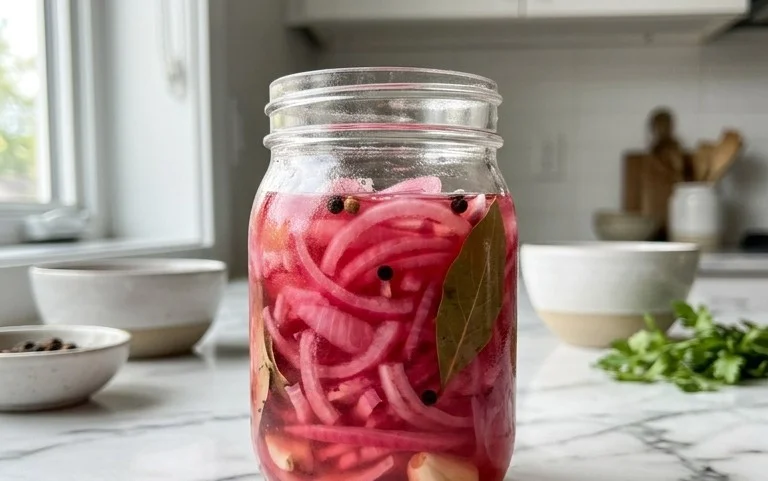
There’s something truly magical about pickled red onions. These jewel-toned slivers of pure deliciousness are incredibly easy to make and possess the power to transform even the most humble dish into something special. Imagin extracte a taco, a burger, a salad, or even a simple avocado toast, suddenly bursting with a bright, tangy, and slightly sweet crunch. That’s the magic of pickled red onions. They add a beautiful pop of color and a zesty counterpoint that cuts through richness and adds a delightful zing. Forget those store-bought jars; making your own is not only rewarding but allows you to control the flavor and the quality of your ingredients. I’ve been making these for years, and they are a staple in my refrigerator. The process is surprisingly simple, requiring minimal active time, and the results are so worth it. Let’s get started on this simple yet sensational condiment.
Ingredients:
Crafting Your Vibrant Pickled Red Onions
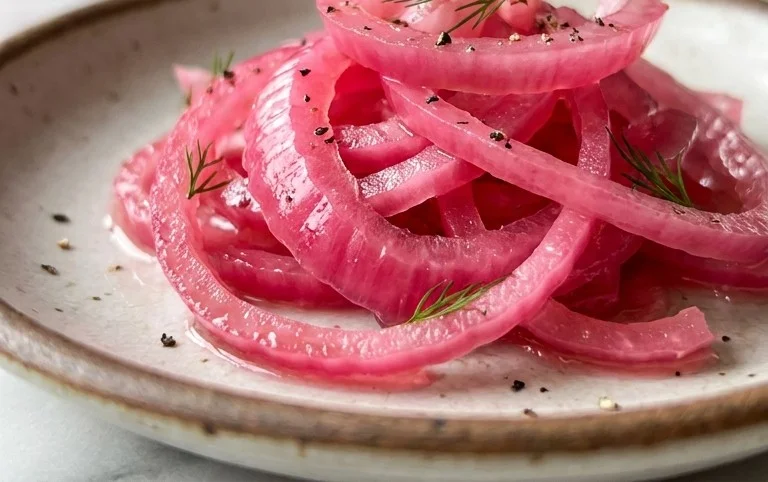
The beauty of this recipe lies in its simplicity and the minimal number of ingredients required. You likely already have most of them in your pantry. The star, of course, is the vibrant red onion. Its naturally beautiful color intensifies during the pickling process, creating those stunning fuchsia-hued strands.
Preparation is Key
The first step in creating these delightful pickled onions is to prepare your star ingredient. You’ll want to choose a firm, fresh red onion. The size of the onion can vary, but a large one is ideal for this recipe, as it will yield a good amount of pickled onion to last you a while. Begin extract by peeling the outer papery layers from the red onion. It’s important to get rid of all the dry, papery bits to ensure a clean pickling. Once peeled, you’ll want to halve the onion from root to stem. This makes it easier to slice. Now, the crucial part: slicing. You want to aim for thin, uniform slices. I find that using a sharp knife and slicing against the grain of the onion yields the best results, creating those delicate, spoon-friendly strands. A mandoline slicer can also be a fantastic tool for achieving perfectly even slices, but a sharp knife works just as well if you take your time and aim for consistency. The thinner you slice them, the more quickly they will pickle and the more tender they will become.
The Brine: The Heart of the Pickle
While the onions are being prepped, it’s time to think about the brine. This is where all the flavor magic happens. In a medium saucepan, you’ll combine the liquid components and the seasonings. Pour in the 1 cup of white vinegar and 1 cup of water. White vinegar is the classic choice for pickling because of its neutral flavor and its acidity, which is essential for the preservation and tenderizing process. The water helps to dilute the vinegar slightly, making the pickle less intensely sharp. Next, add the 1 tablespoon of sugar. As noted, you have flexibility here. If you prefer a less sweet pickle or are watching your sugar intake, feel free to reduce the amount, omit it entirely, or use a sugar substitute. Sugar balances the tartness of the vinegar and adds a subtle sweetness that complements the onion’s natural bite. Finally, add the 2 teaspoons of kosher salt. Kosher salt is preferred for its larger, flakier crystals, which dissolve more evenly and are easier to measure accurately than table salt. Stir everything together.
Heating and Infusing
Once your brine ingredients are in the saucepan, it’s time to bring them together. Place the saucepan over medium heat. You’re not looking to boil the mixture vigorously, but rather to heat it until the sugar and salt have completely dissolved. Stir occasionally as it heats up. This gentle heating process helps to meld the flavors of the vinegar, water, sugar, and salt, creating a well-rounded brine. You’ll know it’s ready when you can no longer see any granules of sugar or salt at the bottom of the pan. Once dissolved, remove the saucepan from the heat. Allowing the brine to cool slightly before pouring it over the onions is beneficial, as it prevents the onions from becoming overly mushy.
Combining and Waiting
Now comes the exciting part where the transformation begin extracts. Take your sliced red onions and pack them into a clean, heat-safe jar. A pint-sized mason jar or a similar glass container works perfectly. Ensure the jar is clean to maintain freshness and prevent any unwanted bacterial growth. Once the onions are nestled in the jar, carefully pour the warm brine over them. Make sure the onions are fully submerged in the liquid. If they aren’t, you can gently press them down with a spoon or add a tiny bit more water to ensure complete coverage. The brine is what will work its magic, softening the onions and infusing them with that signature tangy flavor.
The Patience Game
This is perhaps the most important “step” – waiting! Once the jar is senon-alcoholic aled, you’ll want to let it sit at room temperature for at least 30 minutes to an hour. During this initial period, you’ll start to see the onions begin extract to soften and their color change from a bright red to a more vibrant, translucent pinkish-purple. For the best flavor and texture, however, I recommend refrigerating them for at least a few hours, and ideally overnight. The longer they sit in the refrigerator, the more developed and nuanced the flavors will become, and the more tender the onions will get. They will continue to pickle and deepen in color in the fridge. You can enjoy them after just 30 minutes, but they truly shine after a longer rest.
Storage and Enjoyment
Once your pickled red onions have reached your desired level of tangin extractess and tenderness, they are ready to be enjoyed! Store them in an airtight container in the refrigerator. They will keep well for several weeks, and in my experience, they often taste even better as they sit. These aren’t just a garnish; they are a flavor enhancer. Sprinkle them generously over tacos, burgers, sandwiches, salads, pizzas, or even a simple bowl of rice. They add a delightful pop of color and a burst of flavor that will have everyone asking for your secret. Enjoy the vibrant, delicious results of your pickling adventure!
Conclusion:
You’ve now learned just how simple and rewarding it is to make your own perfect batch of pickled red onions! This recipe is truly fantastic because it transforms humble red onions into a vibrant, tangy, and slightly sweet condiment that elevates almost any dish. The quick pickling process is incredibly forgiving and delivers a beautiful, jewel-toned result that adds both visual appeal and incredible flavor. I’m always amazed by how a small jar of these can instantly transform a meal from ordinary to extraordinary.
The serving suggestions are nearly endless! Think of them as a gourmet topping for tacos, avocado toast, burgers, sandwiches, salads, roasted vegetables, and even grilled fish. They cut through richness beautifully and add a delightful pop of acidity. Don’t be afraid to experiment with variations too. You can adjust the sugar and salt to your preference, add a pinch of chili flakes for a touch of heat, or even infuse them with a sprig of fresh dill or thyme for an extra layer of flavor. I wholeheartedly encourage you to give this pickled red onions recipe a try – I promise you won’t regret it!
Frequently Asked Questions:
How long do pickled red onions last?
When stored properly in an airtight container in the refrigerator, your homemade pickled red onions should last for at least 2-3 weeks. The flavor often intensifies over time, becoming even more delicious!
Can I use a different type of onion?
While red onions are ideal for their vibrant color and slightly milder flavor when pickled, you can experiment with white or yellow onions. However, the color won’t be as striking. The pickling liquid might also need slight adjustments depending on the onion’s natural sweetness.
What if I don’t have a pickling or canning jar?
No problem at all! Any clean, airtight glass jar will work perfectly for storing your pickled red onions in the refrigerator. Just ensure it has a tight-fitting lid to maintain freshness and prevent any odors from escaping.
Quick Pickled Red Onions
A simple and versatile recipe for quickly pickling red onions, perfect for adding a tangy crunch to salads, sandwiches, tacos, and more.
Ingredients
-
1 large Red onion, thinly sliced
-
1 cup White Vinegar
-
1 cup Water
-
1 tablespoon Sugar
-
2 teaspoons Kosher salt
-
1/2 teaspoon Black peppercorns
-
1/4 teaspoon Red pepper flakes
Instructions
-
Step 1
Thinly slice the red onion and place it in a heatproof jar or bowl. -
Step 2
In a small saucepan, combine the white vinegar, water, sugar, and kosher salt. -
Step 3
Heat the mixture over medium heat, stirring until the sugar and salt are completely dissolved. Do not boil. -
Step 4
Add the black peppercorns and red pepper flakes to the jar with the onions. -
Step 5
Pour the hot vinegar mixture over the sliced onions, ensuring they are fully submerged. -
Step 6
Let the mixture cool at room temperature for at least 30 minutes before using. For best results, refrigerate for a few hours or overnight.
Important Information
Nutrition Facts (Per Serving)
It is important to consider this information as approximate and not to use it as definitive health advice.
Allergy Information
Please check ingredients for potential allergens and consult a health professional if in doubt.